| PicoSeti - Pico-BSD based setiathome client Written 01/23/2002 Last Updated 12/16/2005 |
|
NOTE: The SETI@Home project ended 12/15/05. A new SETI@Home project has started and now uses the BOINC grid software, rendering the PICO-SETI project incompatible. Please visit SETI@Home Berkeley for more information. After processing SETI@Home (SAH) packets for almost 3 years, I always wanted a way to run the SAH client on an idle computer, without actually having to install the program. For example, where I work, they have a classroom full of older Pentium II 266 computers that spend most of the time powered off. Keep in mind that when they teach a class, the computers are scrubbed clean, and it is probably not to professional to have the SAH client screensaver fire up in the middle of a class. What I was looking for, was a way I could take a single floppy, boot up on it, and have it start processing SAH packets. This way if the computer was idle/powered off, I could run SETI without interfering with classroom operations. Windows was out of the question, since it was impossible to fit everything I needed on a single 1.44MB floppy. DOS was an idea, but TCP/IP networking needed for SETI for different NICS was a real mess. What I needed was a Unix Solution. I started looking at Linux. The infamous Linux Router Project had links for running SAH, but I really had a hard time building the Linux filesystem/kernel image to fit. I'll admit I did not spend a whole deal of time with it, nor did I RTFM which most likely is the reason I couldn't get Linux to work the way I needed. I started looking for people who had the same idea I had, hoping for someone to do the dirty work for me. I did the google search on Linux Router Project Seti and got some good links. The problem was that the classroom machines I had currently had 3Com and Netgear NICS, and the links that I found had the kernel compiled only for a PCI NE2000, to keep the kernel small. Back to square one. I had just converted my workstation at work from Slackware Linux to FreeBSD a couple of weeks prior. The problem I had with Linux was that after a year and a half of running it, I became swamped with orphaned libs and programs that were no longer needed. While FreeBSD offered a superb package management system, it also provided a floppy based distro in the source tree, called PICO-BSD. The documentation is pretty thin, but I had enough information and experience to give it a go. Below I will document the steps needed to build my custom SAH floppy. |
|
Building PICO-SETI 1. Make sure you have an updated source tree. If you are new to FreeBSD, checkout the online handbook, located here. CVSUP all sources to get everything you need. While your at it, go ahead and update your ports collection also. 2. Become root, you are going to be building system level utilities, so this is a must! 3. Go to the Pico-BSD source tree locate at /usr/src/release/picobsd 4. Copy the net tree to a new tree called seti "cp -rpv net seti" 5. Go to the new seti directory, edit kernel config PICOBSD. The first thing you want to do is increase the ramdisk size, located on line #6. This line looks like a comment and as far as the kernel is concerned, it is. But the program that builds the image, looks at this line to configure the size of the ramdisk. Change the number 2200 to 5120, you will also need to change "options MD_ROOT_SIZE=2200" to "options MD_ROOT_SIZE=5120" also. Go ahead and make any relevant changes to the kernel, most notably the nic type you need. 6. Now is a good time to do a test build. cd /usr/src/release/picobsd/build and type ./picobsd seti 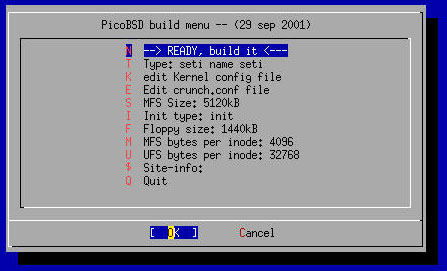 7. Make sure that MFS size is correct, if not, go back to the kernel config. Go ahead a select READY, build it. At this point the kernel and source tree will compile. The time needed varies to computer processor, etc. 8. Once the build is complete, you will be prompted to write a floppy. Insert a blank floppy and select [OK]. When the floppy is completely written, go ahead and boot it up. 9. Once the boot-up sequence is complete, login as "root" password "setup". Do a ifconfig to see if your interfaces are active. If you have the correct interface, assign an IP and route. Test the nic by pinging an internet host. Now check to see if the ramdisk size is correct, using the df command. If the ramdisk is correct, congrats, you have built Pico-BSD. Now lets get seti running. 10. There are two ways to run seti from Pico-BSD. If you have enough free space on your floppy, you can make /usr/ports/astro/setiathome and copy the setiathome binary to /usr/src/release/picobsd/seti/floppy.tree, or after the NIC is configured, ftp the client down from an ftp server/nfs, etc. Originally, I had done the ftp approach which worked just fine. I later trimmed enough fat down from the crunch.conf file to have the binary on the floppy. 11. At this point, you should have a running seti client. You can add entries to floppy.tree/etc/rc for custom startup scripts and other goodies. NOTES I have not had a chance to get dhcp client working yet. I keep getting a compile error when I tried to add it in. I just wrote a csh script that ask for IP,Subnet, and Gateway. Then start the setiathome client in verbose mode. The units are only stored on ramdisk, so if the power goes off, or the computer is shutdown, the current unit will be lost. You can ftp the .sah files somewhere and then shutdown, not pretty, but does the job. DOWNLOADS Here are copies of the PicoSeti I am currently using. The kernel has the 3Com and Netgear NIC drivers. You can untar the source into the /usr/src/release/picobsd directory and then build seti if you want custom nics. Make sure to check floppy.tree/root/start.sh and rc files if you change the nic. If you download the binary, just use dd to write the image to floppy or if your using a windows box, use the rawrite utility. README-PICOSETI PICO-SETI 20020123 Source PICO-SETI 20020123 Floppy Image PICO-SETI 20020123 Readme Win32 Rawrite Updates - 11/14/2003 I have finally created an updated version of PICO-SETI, based on the FreeBSD 4.9-STABLE and using the SETI@Home 3.03 binary. I was hoping to use the 3.08 client, but the build that is available at Berkeley is an elf binary and Pico-BSD currently only runs a.out binaries. This build now supports Intel x86 processors 486 or better, and also supports 3Com 3C905x, Intel Pro 100, and newer Netgear nics. Sorry to say, there still is no DHCP support (if you know how to do this, please email me!). There is still a lot of garbage in /etc that probably could go away, but the build script seems to ignore my floppy.tree.exclude file. I also feel the need to reiterate that the only code that belongs to me is the simple shell startup script. All credit for PICO-SETI go to the FreeBSD and SETI guys (thanks guys!). For those people who are rolling their own Pico-BSD based floppy (and not using the PICO-SETI source) please note that the source tree layout has changed since the 4.6 based build and the build process differs from the above. I have found Bruce Montague's Tentative Pico-BSD FAQ to be very valuable. Updates - 11/17/2003 I have added a "options" input in the start.sh script so that users can now specify SOCKS and PROXY information if needed. This will allow a little more flexibility. Updates - 11/18/2003 NFS Client support is now available. After the initial network configuration, you will be prompted if you want to connect to a NFS share. If you answer "y", you will then be prompted for the ip address and share. All of the ".sah" files will be written to the NFS share (which obviously must be writable). Added a configuration confirmation prompt to start script in the case of "fat fingering". Pruned /etc and Kernel config. Please note that other than a simple confirmation, the start script does not have any error detection, so "garbage in, garbage out" rules apply. This is mostly due to space constraints. PICO-SETI 20031118 Source PICO-SETI 20031118 Floppy Image PICO-SETI 20031118 Readme |


|
©2004-2020 Paul Boehmer |


 |