| Updates to the MAME Cabinet | |
|
Updates Here is a list of updates I have made to the MAME cabinet since the completion April 2005. Some of the updates are minor while others could be considered major hardware rebuilds. 2019.03.27 Wow, over 6 years since any documented updates on the cabinet. The IBM 21in CRT monitor that was in the cabinet decided to take a dump this past November. The good news is that I had an old Viewsonic 21in as a spare, bad news is that the Masonite monitor surround didn't quite match up, so it had to be pulled. A simple monitor swap quickly snowballs into a bit of cabinet re-working. Part 1: Upgrading Joysticks I know, how did replacing a monitor require upgrading the joysticks? Well, I honestly couldn't tell you other than the fact when I saw these Ultimarc Servostik, I just couldn't pass on them. The original J-Stick controllers I installed worked great and even had a 4/8 way restrictor plate. The problem is that you had to have access to the bottom guts of the controller in order to change the restrictor plate, so for the entire time, it was just stuck in the 8 way mode. The ServoStik controller adds a servo motor to change the plate remotely. The little PCB controller board is designed to be used via MS Windows application, but can be configured to be in hardware mode (no going back once set). With the new joysticks on order, it was time to work on the new monitor surround. Part 2: Upgrading the Sound The original surround was just painted gloss black and had a 2x6in laminated instruction sheet. I was never really happy with it, but it did the job. Also, the volume control and sound was a bit of a hack job as well. I didn't really go into it, but the sound system was just a typical cheap powered PC speaker set that I had extended the volume/power knob wiring to the surround. It was flaky as heck, but it sufficed. Since I was replacing the surround, I decided it was time to get a proper amplifier with volume control installed. I opted for a Dayton Audio DTA-2 amp from PartsExpress.com. Powered by 12v supply, 15w stereo output, and remote volume/power control. Perfect! Part 3: Something about a surround? While waiting for parts to arrive, I started work on the surround. I had enough spare 1/4in Masonite laying around, so it was cut to match the original surround as far as cabinet opening size. Once cut, it was then time to center up the monitor and then cut the opening for the screen. This took a bit more time, as the Viewsonic monitor is slightly bit bigger than the IBM. I had to remove the monitor desk stand and shim it up with a piece of 2x4 in order for the monitor to be centered up in the opening. 

Instead just painting the surround gloss black, I quickly (OK, spent a bit more than a couple of hours total time) coming up with this: 
It's always nice to know someone with a large format printer (thanks Dawna!). Keen viewers will note that I had completely ignored that I will be cutting out a good portion of the center of the pic for the monitor. I had planned on erasing a small square in the middle to give me some wriggle room, but sent the wrong version to be printed. No worries. The color scheme a derived from the control panel and cabinet sides. I applied a light coat of adhesive spray on the back of the print and rolled the print onto the Masonite. I did have some centering issues, and I should have had an additional hand getting the print laid down, but in the end it worked out with just a couple of creases. I was a bit worried about how the paper would hold up over time, so I decided to purchase some plexi-glass to put over the entire surround. In hindsight, I should have pre-drilled holes for the volume control and plexi-glass before mounting the print for a cleaner look. I used brass wood screws to keep the plexi in place. Speaking of the volume control, I slightly miscalculated the position between the cabinet and monitor, so it forced the monitor to the right about 3/16in. I also ran into a small issue with the combined thickness of the Masonite and plexi-glass preventing the control board from mounting, so the plexi had to be trimmed. I still need to clean up the cut, as it's pretty sketch. Apologies for the quality of the picture below, combination of bad lighting and the highly reflective plexi-glass. 
Part 4: Back to the Sticks With the surround completed, and the parts needed for the ServoStik's, its time to get it all wired in. I purchased a pair of square backlit switches for restrictor control and indicators. The plan is to mount a microswitch to one of the controllers and use that switch to light up the active restrictor mode. It took a little work to get it to work reliably, so we'll see how it holds up over time. I also printed up some small labels for the switches. The pair of green switches next the the player 1 and 2 buttons were being used as coin drops, which were made redundant after adding the coin slot buttons on the control board years ago. This made it a perfect spot for the restrictor selection buttons. 

Here's some videos from above and below (unfortunately not in sync, but you get the idea): 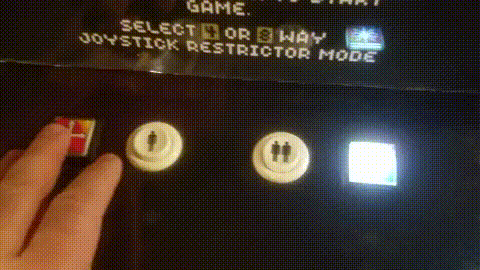 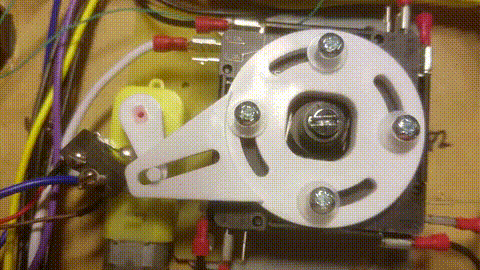
2016.08.11 Seems the support for MAME under FreeBSD is not up to speed. While the FreeBSD port stagnated at MAME 0.168, I was able to hack the build process for version 0.171, but since I have not been able to get a complete build. That being said, I have reloaded the cabinet with Arch Linux. I chose this specific distribution for it's compactness and it was also well documented by a post by user "ozfalcon" on the Z-System Post on Aussie Arcade. 2013.01.02 After several years without any hardware changes, the capacitors for the CPU's voltage regulator on the Gigabyte motherboard decided to pop while I had the system in the shop for software updates. After some debating, I went ahead and pulled the trigger on a MSI H61M-P31/W8 board along with a Intel 2.4ghz LGA 1155 Celeron processor and 4gb of DDR3 ram. Since the new board only has a single 16x and a single 1x PCIe slot, a new video card was also due. I opted for a simple MSI nVidia 8400GS 256mb card. All of that was just under 200.00 from Newegg, not too shabby. I made use of a spare 500gb SATA drive and decided to install the compressed hard drive images (CHDs) now that I have a system capable of playing everything. Added bonus is that the new motherboard has solid state capacitors. 2008.04.03 I received my NovaMatrix Marquee light today. I pulled out the cold cathode lighting and soldered some wire to the leads so that it can get power. One the light bar is wired up, I fired up the Cabinet. The single NovaMatrix is a bit brighter than the two cathodes. When I ordered the light, I pondered getting a second in fear that one unit would not be enought, but I really thing the single unit does just fine. 


The cathodes were put in the cabinet in a "V" formation, so I needed a new way to mount the NovaMatrix so that it was in the center of the marquee. I looked around the shop for something to hold the light into place and came up with an unusual solution, PCI cover plates. I drilled some holes into the tops of the plates and used short wood screws to attach them to the cabinet. The plates had ends on them that held them to the backplane, which worked great holding the NovaMatrix PCB into place. I'll admit its not pretty, but it works. 


2008.03.30 The inverter driving the two white cold cathodes died a couple of months ago. The cold cathodes had worked pretty nicely, but I was hoping to get a little more life out of them. I started shopping for a replacement inverter, but the thought of having to replace the thing in the future made me start looking into alternatives. When I purchased the spinner and coin drop buttons from Groovy Game Gear, they had announced a new product called the NovaMatrix LED Marquee light. For $17.95, the price was right, so I placed my order. 2007.08.10 When I installed the spinner and coin drop buttons a couple of weeks ago, I had left out mentioning a little trouble I had getting the power switch, HDD LED, and Power LED wired back up, as well as the additional 5volt line to power the coin drop button lighting. I had designed the control deck to be easily removed and decided to use a terminal block for the hookups. After removing the control deck the past couple of times, disconnecting and wiring up the terminal block became more and more of a daunting task. On my way to work, it occurred to me to use a pair of CAT5 surface mount jacks and a CAT5 cable to create a quick disconnect. So I laid out the connectors like:
I admit this does not allow room for expansion, but works out darn pretty well. So for the first part, I wire up one jack with motherboard header cables and add a molex connector to pins 7 and 8. By itself, the motherboard side module looks pretty plain, so I added a LED to the top of the jack and wired it to the 5volt lines. The only purpose for this is just to serve as an indicator that the 5volt line is working (read bling). 

The next step was to wire up the controller side module. I removed the old terminal block and replaced it with a surface mount jack. Then its just a matter of wiring up the block using the wiring diagram above. I did not add a LED indicator to this module, but I did give the jack cover a coat of black vinyl paint to try to blend it in with the back of the deck (not that anyone will see it). When I removed the terminal block, it left four screw holes in the back of the deck. Two of them are covered by the surface mount jack, but the other two are exposed. I just dabbed some black magic marker over them, not the greatest solution, but they are located on the back of the deck out of view, hardly worth the effort of sanding, filling, and painting. 


So now to connect the motherboard header and 5volt lines to the control deck, its just a matter of plugging in a standard-straight through CAT5 cable into both jacks. 
2007.07.21 Since I finished the spinner last night, I spent the afternoon putting in the coin drop replacement buttons. I measured out the front of the control deck to determine the drill points. Since the coin buttons are only 7/8th inch diameter, I drilled out two holes with a 1 inch spade bit. The back of the buttons have two small round protrusions to prevent the buttons from rotating, so I needed to drill two small holes to accommodate them. 


Once the holes are drilled, its just a matter of putting in the buttons, securing them with the backing nut, and then wiring them up. I moved the existing player one and two green credit buttons to the player three and four credit channels on the I-PAC controller and wired the new coin buttons to the player one and two credit channels. Since the coin buttons are back lit with 5v LEDs, I initially tried wiring them to the same line supplying 5v to the power LED, but could not get them to work (too much draw?). So the solution was to run a cable pair from the coin buttons to a floppy drive power connector. 


Then I put the control deck back together and mount it back to the cabinet. I fire up the cabinet and everything lights up and works correctly. I must say that the addition of the coin drop buttons really give that authentic arcade cabinet look without the need for the actual coin door mechanism. 

2007.07.20 I broke down and purchased a spinner last week. This was not exactly a planned purchase, it all happened when I was looking for information on sdlmame and one of my google searches turned up a MAME arcade forum that had an announcement from Groovy Game Gear that they now carried illuminated coin drop replacement buttons. I thought these would be the perfect thing to finish off the cabinet. While I was there, I also noticed that they had a spinner that fit in the standard 1 1/8th button hole. The price was right (until I added the nickel plated knob) so I picked up one of those as well. So I received the parts on Thursday and spent Friday night putting in the spinner. The spinner is connected to a USB encoder and then linked to the motherboard via a standard USB cable. 

I designed the control deck to be removable for easy upgrades, so I removed the deck and opened up the bottom to gain access to the controls and wiring. I had mentioned earlier that the spinner fit in a standard 1 1/8th inch hole and the primary reason I needed a small form factor spinner was due to the lack of space inside the control deck as you can see below. In order to put the spinner in the center of the board, I needed to move the I-PAC controller off to the side. Next I measure out the center of the deck and start drilling a hole with a 1 1/8th inch spade bit. 


Once the hole is drilled, its just a matter of putting in the spinner and hooking up the USB encoder. In order to keep the encoder from flopping around, I used a small wood screw to keep in place. Since the hole in the encoders circuit board is located right next to an IC chip, I used nylon washers to keep the screw from shorting the IC chip out. 


Below is a picture of the control deck with the spinner mounted. In order for FreeBSD to see the spinner, I needed to add the appropriate USB options to the kernel and recompile. I also needed to enable the USB options in /etc/rc.conf. Once the kernel is compiled, a simple reboot enables the spinner. In order for MAME to use the spinner, I edited the mame.ini file and changed mouse from 0 to 1 and dial and paddle devices from keyboard to mouse. The spinner now works in Tempest and Arachnoid without further modification. 
2007.06.04 Wow, over a year without an update to the cabinet. For some stupid reason (boredom, or possibly the need to royally screw something up) I decided to update the rompacks to the latest versions without doing some basic research. After the rompack update, I soon realized that a good portion of the games I have had stopped working. This is where it all went downhill... I just assumed that I needed to upgrade my version of xmame, so I updated my ports collection. Over a years worth of updates to the ports collection was pretty substantial, so I ended up updating the source and running a buildworld to recompile the FreeBSD operating system. The buildworld update went without a hitch and then I rebooted the box and started to upgrade all of my ports. Two weeks prior to this update, FreeBSD had upgraded from Xorg 6.9 to Xorg 7.2. This requires all of the ports dependent on xorg to be recompiled as well. So the cabinet ended up compiling software for a better part of a day. I had no problems upgrading the various ports, including xmame. Still the games refuse to run, indicating that I am missing various roms. At this point I have updated the system and all of the ports. After some investigation, it turns out that the xmame development has been pretty much dead since late August 2006. It also turns out another Unix MAME port called AdvanceMAME is also no longer being actively developed. Apparently, there had been some major architecture change in the video code that caused a lot of grief with porters (I guess?). The only other MAME port in FreeBSDs port collection is called sdlmame, which is what xmames page suggests as a replacement. So I compile the port, issue a rehash, and change my .xinitrc to just start up a game of Pac-Man by commenting out the AdvanceMAME and unclutter lines.
I start X up and it immediately kicks back out to console indicating that the roms are missing. I then change the line to read:
Pac-Man now starts up, but the speed is very very slow. I mean, come on... A 1.6ghz processor, a gig of ram, and a video card with 128mb of ram, and it cannot play a simple game of PacMan. After a good deal of research, the problem comes down to hardware acceleration support in Xorg. Apparently when it comes to ATI graphics cards, there is little support for hardware acceleration in the open source radeon driver. ATI has a proprietary driver for linux, but not for FreeBSD. I managed to dig up a nVidia GeForce 3 card and swapped out the ATI card. I installed the nvidia-driver-9631 port and made the appropriate changes to my xorg.cfg file. I start up xorg again and now I can play PacMan in all of its OpenGL glory. I had a little issue with getting sdlmame to work with its configuration file. If you issue the command "sdlmame -createconfig" it will create a file named "mame" in your .sdlmame directory. The problem is that this file never seems to be read and sdlmame does not give the option to specify a config file location. A brief google search did not turn up anything, so I started looking at the source code. It turns out that the program tries to load "mame.ini", so I renamed the "mame" file to "mame.ini" and sdlmame now reads in the configuration file. All thats left is to make some basic changes to the Advancemenu configuration file to look for sdlmame instead of xmame and we are now fully operational again. Now that wasnt so much of a chore was it? 2005.12.23 I had a buddy over the house last week, showing off the MAME cabinet and he made a comment about the lack of a volume control on the front of the cabinet. Originally, I had yanked the amplifier out of a cheap pair of computer speakers and mounted the thing inside of the cabinet (see below).  For the most part this worked, since I can adjust the game volume with the joystick. The problem was that I had no way of controlling the volume of the MP3s playing from AdvanceMenu. I had the day off with nothing better to do, so I broke down and moved the volume control from the amp's PCB to the front of the cabinet. I de-soldered the stereo variable resistor and soldered in 6 wires of a 3ft piece of CAT5 cable. Making a note of orientation, I then soldered the six wires onto the variable resistor. The first problem I ran into was that I had plugged the line in into the headphone out line of the amp and I ended up spending a good 30 minutes trying to figure out why I had no sound, doh! Now that I have a working volume control, I drilled a hole into the front of the monitor masking board so that the shaft of the volume control fit through. When I went to mount the volume control, I noticed that I was missing the flat bolt holds the volume control into place. I ran down to the local hardware store and could not find an appropriate bolt, so came back to the house empty handed. I could have ran out to the local Radio Shack and got a new variable resistor, but the idea of having to deal with last minute Christmas shoppers convinced me to just glue the volume control into place. After a couple of hours, the control is securely held into place. 2005.12.09 Dug up an unused Western Digital 40gb drive for the MAME cabinet. I had dreaded installing the OS from scratch and copying the configs over, etc. I decided that I would try "dumping" the existing partitions onto the new drive, to try to save some time. I mounted the new drive on the secondary channel and booted up the MAME cabinet. I ran /stand/sysinstall as root to partition the new drive and immediately ran into problems. No matter what I did, the root partition ("/") on the new drive would always be setup as ad2s1e and would result in the boot loader not able to access the partition. To get around this, I ended up booting off of a FreeBSD install CD and did a minimum install on the new disk. Then I booted off of the existing MAME disk, performed newfs each of the new partitions, and then mounted the new drive with the following mout points: /new_root /new_tmp /new_var /new_usrNow I just issue the following commands to dump the old partition to the new partition: cd /new_root dump -0uf - / | restore -rvf -And do the same for tmp, var, and usr partitions. The whole copy took a couple of hours (20gb) and I had to slightly modify the new /etc/fstab file on /new_root because the var and tmp slice letters where swapped (not sure how/why that happened). I put the new drive on the primary/master channel and booted up with fingers crossed... success! 2005.11.24 Now that I have built a new workstation, I have recycled the parts out of my old box for the MAME cabinet. The original hardware was a Pentium III 550, 32mb RAM, Nvidia GeForce, and a 20gb hard drive. New hardware for the cabinet now: Athlon 1600+, 1gb RAM, ATI Radeon 9500, and for the mean time, keeping the existing 20gb hard drive. For some reason, I notice a great increase in game performance (a little sarcasm). At some point I will need to move to a bigger hard drive, as the 20gb drive is currently at 95% usage (less than 200mb free). |
|


